Latest Hacking tricks, hacking tricks, Best hacking tricks 2017, Hacking tips, Tech hacks, Android hacking tricks

adx ads

Thursday 14 March 2019

FonePaw Screen Recorder: Record Computer Screen with Audio and Webcam

FonePaw Screen Recorder: Record Computer Screen with Audio and Webcam

Want to upload and share some fantastic game playing moments with your friends? Need to demonstrate some tutorials to others? Feel inconvenient when you want to download some videos but the website does not provide built-in download feature? A screen recorder appears when you have the above needs.

There are many options for screen recorder in the market, and today we are going to review FonePaw Screen Recorder. It is a screen recorder for Windows and Mac computer to capture video, audio and screenshot.

FonePaw Screen Recorder provides many features and we are going to test the below three basic features for the recorder today. More feature introduction will be presented at the end of the article. These three main features are as per below:


  • Easily record screen activities and webcam video in HD.
  • Snapshot for the desktop and add annotation to it.
  • Simultaneously record with audio from microphone and system sounds.


Recording Test
We download FonePaw Screen Recorder from it’s official page:
https://www.fonepaw.com/screen-recorder/

The software is downloaded and installed quickly without any hassle. The main three features are well presented in the main page when you start the recorder, which is quite user-friendly.
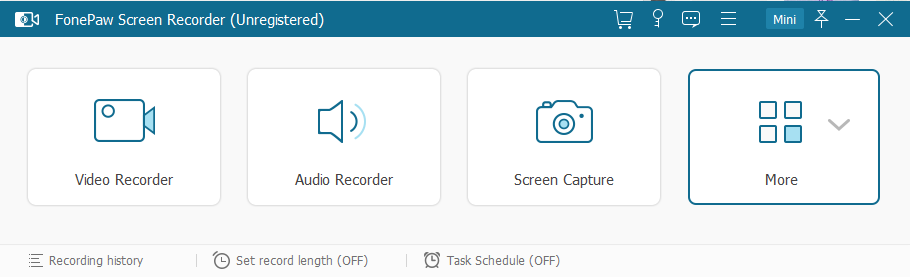


1. Video Recorder


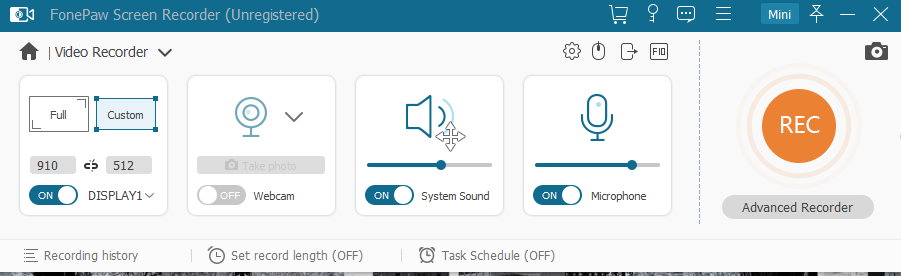
  • You can choose Full Screen Record or Custom Screen Record according to your requirement.
  • System sound and microphone sound can be recorded at the same time.
  • Webcam can be enabled in the screen recording. 
  • With the above three features, you can record any screen activity with audio. For example, you can capture your some special computer game moments by customizing the screen in your game zone, and adds your commentary via microphone when recording the screen. In our test, the recorder runs without lag when recording gameplay and the recorded video comes out clear. 


2. Audio Recorder


You can navigate to Audio Recorder simply by selecting the button on the up left corner. Similar to Video Recorder, system sound and microphone sound can be recorded at the same time. The audio can be recorded to MP3, AAC, etc.
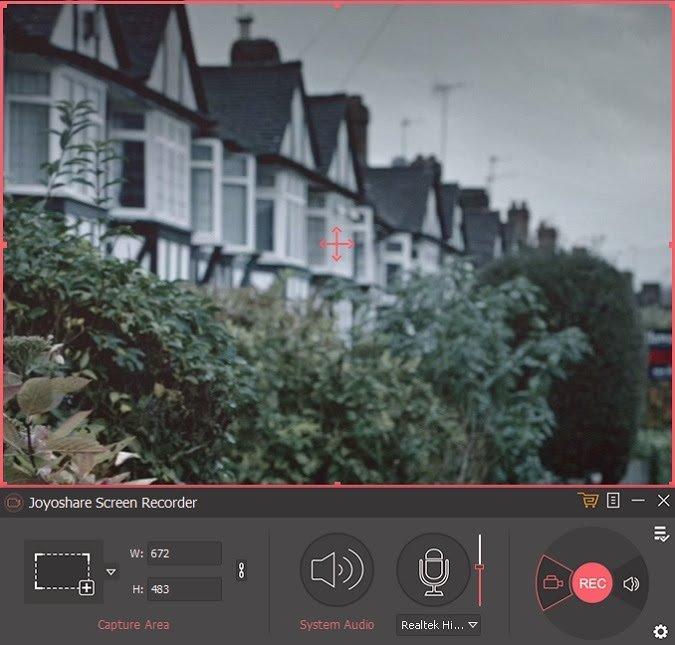


3. Screen Capture

  • The screen capture size is clearly presented on the screen immediately once you select the feature. You can adjust the size to take screenshot of a specific area.
  • Maginfying glass tool is provided to help you to locate the screenshot area more precisely. 


Conclusion
All in all, FonePaw Screen Recorder shows as a professional video screen recording software which can capture your screen for Windows and Mac computer system. Simple and neat interface, useful tools with only several clicks, makes it an outstanding one in its kind.

Disadvantage
For audio recording, system sound is not supported for Mac computer by default. A tool named Soundflower is needed to work with the recorder. Look forward seeing improvement in internal audio recording in the next version.


Tips at the end
FonePaw Screen Recorder has many small features to make screen and audio recording on a computer easier.

  • Audio Recording: Record screen and audio together from both systems and microphones. 
  • Webcam Recording: It is possible to record your webcam video only or along with screen activity.
  • Snapshot: One click to capture your desktop or get a snapshot from the recording video. 
  • Annotation: Create a unique video with drawing or adding texts, arrows to the recording or screenshot.
  • Scheduled Recording: Easily set the recording length for the video as you like (only on Windows version).
  • Customize Recording Area: Select the entire computer screen or part of it to begin your capturing.
  • Track Mouse: Make mouse cursor stand out and show the mouse clicks to customize your recordings.
  • Select Output Formats: The recorded videos can be saved in different video formats(MP4, MOV, WMA, FLV, etc.) in output settings. MP4 is recommended.
  • Set Video/Audio Quality: The output video and audio quality can be set as High, Medium and Low.
  • Hotkeys: Set up hotkeys for certain operation so you can take quick action when recording.
  • One-Click Preview: Quickly check the recorded history (videos and screenshots) and you can share or delete in one click.
  • GIF Maker: Export recording as GIF image and set up its frame rate (only on Windows version).


Share:

Saturday 21 July 2018

DRM M4V Converter for Windows - iTunes DRM Removal Made Easy

Have you ever wondered why you are not able to play any media files which are developed by Apple on any other player or device with different OS? The reason is that these media files are protected or has a DRM (Digital Rights Management). The DRM is used as a copyright material which can be enabled in any  M4V or similar type of media files. Therefore allowing such files to be played on proprietary hardware, software, & so on.
In case you find something more attractive, informative, or so but unable to access the same in your own device than there is no use of investing such heavy amount to buy such proprietary products. Instead, to play such files, there are DRM Removal Software, DRM removal tool and DRM removal program available online which can help to convert DRM M4V files to any other format. There are various DRM removal software which can also be used for M4V Converter for Windows. Such DRM M4V Converter for Windows can be downloaded and use under trial version to check the performance of DRM removal program or algorithm. If you find such DRM removal for Windows as a WOW option, then you can buy the license version of the same. This will be more economical than buying the proprietary hardware, software or anything similar.
The features of DRM removal for Windows or M4V Converter for Windows are as mentioned below -
  • Remove iTunes DRM at 30x faster speed
  • Losslessly remove DRM from iTunes movies and TV shows to multiple non-Apple devices
  • Best and fastest DRM M4V to MP4 converter
  • Keep AC3 5.1 Dolby surround sound, AAC stereo tracks, AD, CC, subtitles, etc.

The user interface of such software is attractive and user-friendly. Majority of the DRM M4V Converter support to cut or edit videos, add sound effects, watermark and much more. The video can also be exported against chapters. In addition to that, these various types of software or tool are also capable enough to resolve few known bugs.

The hardware required to install and run such software is basic. The specification of hardware is as mentioned below -

1) Operating System - Windows XP, Vista, Win 7, Win 8, Windows 10
2) Processor - 1G Hz Processor or better
3) RAM - 256 MB or better
4) Monitor - 1024x786 or better resolution
5) Other - iTunes 12.6.1 or any lower version


The DRM removal for Windows supports various input files such as DRM-ed M4V (iTunes Purchased and Rentals protected by DRM), MP4, M4V, WMV, SWF, MPEG, DAT, HD MOV, NSV, MXF, VRO, WTV, etc. which may or may not be DRM protected.
Such DRM protected or non-protected files can be converted to various Videos and Audios Formats like MP4, MPEG, MKV, AVI, 3GP, DivX, MOV, WebM, MP3, AAC, AC3, AU, WAV, FLAC, and much more respectively.


The result of such DRM M4V Converter for Windows can be viewed, played or access from devices like iPhone X, iPhone 8/8 Plus, iPhone 7/7 Plus, iPad Pro, iPad Mini, Apple TV 1/2/3, Apply TV 4K, Apple Generic, Samsung A7/A9, Galaxy Tab, Galaxy Note, Google Pixel, Huawei P10/P10 Plus, Motorola Droid, Android Generic, Samsung TV, LG TV, Sony TV, Panasonic TV, Windows Phone, Game Consoles, Youtube, Facebook Vimeo and much more.
Download and check out the trial version of the software.


Waiting for your valuable feedback and comments...

Share:

Friday 18 May 2018

TuneFab Apple Music Converter:Easily Convert Apple Music to Multiple Formats

TuneFab Apple Music Converter:Easily Convert Apple Music to Multiple Formats


Users who listen to Apple Music all the time will be easy to figure out that the Apple Music format is created as M4P file format, which is limited and protected by what we called DRM. It is inconvenient for users who want more from Apple Music. Hence, a question emerged that is it possible to enjoy Apple Music with different file formats, like MP3, FLAC, M4A and so forth? At this moment, TuneFab Apple Music Converter will be the second-to-none option according to your needs.


Synopsis of TuneFab Apple Music Converter


As for various kind of Apple Music Converters are available on the Internet, TuneFab Apple Music Converter is the professional, maneuverable and powerful Apple Music DRM Removal, which offers the downloading function and converting function for your Apple Music. With TuneFab Apple Music Converter, you can enjoy the function as follows.


Functions of TuneFab Apple Music Converter


Downloading & Converting Function: The users of TuneFab Apple Music Converter will enjoy the downloading Apple Music, albums, playlists, iTunes Audiobooks, and Audible Audiobooks by converting and removing DRM from Apple Music.


Choosing Files Formats Function: There are multiple file formats can be used when converted Apple Music, like MP3, M4A, FLAC, MKA, AC3, AU, AIFF, and etc.


Audio DIY Function: Before conversion, you can enhance your music by resetting the channel, bitrate, sample rate and choose the quality of audio on your own. Therefore, you can enjoy the converted music perfectly suit your tastes.


Conversion Speed Adjustment Function: Time is money, so TuneFab Apple Music Converter offers you to adjust your conversion speed, from 1X to 16X. The higher conversion speed you set, the faster conversion speed you get. Thus, I suggest setting the conversion speed 16X for faster conversion.


Perfectly Compatible Function: If you are worried that the converter is not compatible with your computer, TuneFab Apple Music Converter is the one which helps you free from this problem. It is fully compatible with the latest version of iTunes and it supports both Windows and Mac.


So why not download TuneFab Apple Music Converter for enjoying such powerful functions? And the step by step guide will introduce in below.


Step 1. Download TuneFab Apple Music Converter
There is a download button above which are available for downloading TuneFab Apple Music Converter. Click the compatible version of your computer and following the installation to finish the installation task.


Step 2. Select Apple Music Tracks You Want to Enjoy in Different File Format
After having installed TuneFab Apple Music Converter, launch it and then you can view the whole TuneFab Apple Music Converter interface together with your iTunes Music Library. Here, select the songs you want to enjoy in other file formats by ticking the checkbox right before each song.


Besides, if you fed up with scrolling and finding your songs, there is a knack for you. That is in the search box, typing the name of the playlist, album, and artist and then you can find the songs at ease. Also, batch conversion is allowed in TuneFab Apple Music Converter. So you can convert multiple songs at a time.
Choose Apple Music Tracks


Step 3. Select the Output File Format You Want to Listen to
After selecting, it is the right time for you to choose your output file format. There are a lot of file formats you can take into consideration. They are MP3, MKA, AU, AIFF, AC3, M4A, FLAC and so forth. Apart from this, you can also reset the SampleRate, Bitrate, Channels together with the quality of your Apple Music songs.
Note: You can also set the output folder by clicking the 3 dot and choosing the folder you want to.
adjust-output-settings

Step 4. Faster Your Conversion Speed
Click on Options and a Windows will pop up. On this interface of Window, there is seek bar for you to select the conversion speed, from 1X to 16x. As stated before, the higher, the faster. Therefore I recommend opting 16X for the best conversion speed.
Select the Conversion Speed

Step 5. Click to Convert and Get Your Fresh Converted Files
Click on the Convert Button after all the prep are done. Several minutes later, you can get the converted files on the location of your files. Enjoy your Apple Music right now!
start-converting


To sum up, TuneFab Apple Music has a lot of useful functions for you to dig out. If you are unaware of it, visit TuneFab website and read more tutorial on using TuneFab Apple Music Converter as well as Apple Music. If it is useful or reasonable for you, please don’t forget to share with your friends via Facebook, Twitter or Gmail. Comments and questions are welcome when email to TuneFab Support team.


Write Behind
TuneFab fully respects the copyright protection law in the U.S. and we will never encourage our users to use the software for any kind of commercial purposes. The No Commercial Use Policy is encouraged in TuneFab to prevent unauthorized reproductions of Apple's copyrighted media content including movies, music and audiobooks. TuneFab simply wants to provide solutions to help the actual owner of Apple Music, iTunes movies, audiobooks to get full control over their purchased iTunes media.

Share:

Wednesday 16 May 2018

Joyoshare Screen Recorder for Windows Review

Joyoshare Screen Recorder for Windows


As many of the people nowadays have gone digital, the use of electronic gadgets such as desktops, laptops, smartphones, etc. has increased. The application of these gadgets is not limited to be socially active but has also played an important role to transform e-Learning. The process of e-Learning is either by watching a YouTube video or by watching some personal videos or attending webinars. Similarly, there are speakers for various topics, who share their knowledge either by going live over the internet or closed webinars. But in case if you miss those live session, the recorded session need to be purchased. These are some problems which have lead to the development of Joyoshare Screen Recorder for Windows.

The screen recorder for Windows is compatible with Windows 10/8/7/Vista and XP. This screen recorder for PC, Laptop, etc. can be downloaded and tried for free. The screen recorder software has various applications as mentioned below -
a) Screen Recorder for YouTube - Even thou YouTube has provided an offline feature, the downloaded video cannot be shared with anybody or saved elsewhere. So, you can use Screen Recorder for YouTube to record and save the YouTube video which is been played in multiple formats as per your device's media player compatibility.
b) You can record and save any audio and video which is been played on your screen
c) The screen recorder tool is capable enough to capture only audio and save in various formats like MP3, WAV, FLAC, M4A, and M4B.
d) The recording from the PC's or Laptop's screen activity can easily be configured and are flexible.
All the above points were for the learners, but if you are a speaker or lecturer, you can use Screen Recorder Software to record the audio and video of your entire session. The screen recorder tool is so flexible that if required, you can adjust or select the portion of your screen which needs to be recorded without distorting the video resolution.
The system requirement to install this Joyoshare Screen Recorder are -
a) Support OS - Windows XP/Vista/7/8/10
b) CPU - 1 GHz (64-bit) or above
c) Available Hard Disk Space - 200 MB or above
d) RAM - 256 MB or more (Recommended RAM - 1028 MB)
The lists of various video streaming sites tested by our team and shared by our valuable customers are YouTube, Yahoo, Facebook, Metacafe, Netflix, Spotify, TED, Vimeo, and much more. The tool also supports 4K videos, HD videos and SD videos. The various output video and audio formats supported by this tools are ASF, MOV, M4V, MP4, WMV, AVI, MPEG-1, 3GP, 3G2, DivX, MP3, AAC, WAV, FLAC, M4A, and much more respectively. The supported devices vary from brand to brand. The lists of supported devices are -
1) Apple - iPhone X, iPhone 8 Plus, iPhone 8, iPhone 7 Plus, iPhone 7, iPad Pro, iPad Air, iPad mini, New Apple TV, Apple Generic, etc.
2) Samsung - Galaxy S8, Galaxy S6, Galaxy S5, Galaxy S4, Galaxy S3, Galaxy S2, Galaxy Tab, Galaxy Note, Galaxy Nexus, Galaxy S, etc.
3) Game Consoles - Xbox 360, Xbox One, PlayStation 3/4, PSP, Nintendo Wii, etc.
4) Smart TV - Samsung TV, LG TV, Sony TV, Panasonic TV, etc.


The Following is a guide on how to use the Joyoshare Screen recorder software. Once you have downloaded the software, install it and open it by clicking the software icon on your desktop. After opening it you will see the following window.

1.Capturing the screen
Click the plus (+) button in the capture area section,you will get the recording window popped up.Now you can choose the recording area according ,to your requirements.You can also choose the fixed recording window sizes such as 1280x720, 640x480, etc.

2.Customizing Output settings


Since this is a professional screen recording application, it comes with a plenty of recording features. Joyoshare Screen Recorder output supports almost all kind of video formats, including MOV,MP4, FLV, WMV, SWF, M4V, AVI, etc. Another great thing is that you can record everything you like including gaming videos, Skype video calls, streaming videos and even you can record your very own tutorials. The tool is almost compatible with all popular devices such as the Android, iPhone, smart TV ,Xbox, etc. and so on.


Final words

Finding a good software is compared to finding a good girlfriend online by many people. There are number of options available in the  market and if you choose in a hurry you may end up getting cheated. I strongly recommend this screen recorder because it comes with plethora of features.
In the duration that I have used this software, I found a plenty of good features which have been benefited my business in a lot of great ways so if you are looking for a best screen recorder this is the one you should choose. Unfortunately, there is no free version of this software. However there there is a free trial version. Once the trial period is over, users need to purchase it.

Plus, the company has an excellent customer support which will help you to contact them in future.So what are you waiting for? Simply download the trial version and start recording.

Share:

Saturday 17 February 2018

BlitzWolf BW-F3 Water Resistant Bluetooth Wireless Speaker Review

BlitzWolf BW-F3 Bluetooth Wireless Speaker is the best reason to start a party anywhere and anytime. This BlitzWolf BW-F3 is a portable system which consists of two speakers. The speaker with 5W power each has the ability of play Hi-Fi music loudly, robust bass and sound clarity is crystal clear under most of the outdoor conditions.
As it is a portable Bluetooth Wireless Speaker, the inbuilt rechargeable battery is Lithium battery with 2000mAh rating. The battery is capable enough to power the speaker for around 8 hours with 70% volume. The approx. charging time of this speaker is around 4 to 5 hours.

BlitzWolf BW-F3 being a portable wireless speaker is designed with to withstand various weather condition and long lasting. The device is IP65 which means it can withstand the dust from entering. Also, the device can resist the minimum water pressure. The design also has shockproof and water resistant Mic and TPU shell which is water resistant. The weight of BlitzWolf BW-F3 is bit heavy when compared with other portable speakers available in the market. This can be a problem to some of the users but is ideal for the one who is looking out for a rugged portable wireless speaker. The speaker is constructed with the sturdy plastic and edges are protected with rubber. This serves as a cushion to the speaker. The body is so tightly fixed that it does not allow a single drop of water to slip inside.
BlitzWolf BW-F3 Water Resistant  Bluetooth Wireless Speaker Review 

The USB and AUX cords require for this speaker are a standard cable which is available easily by any OEM. It has micro USB charing port and audio jack of 3.5mm for interface.

The buttons on the devices like Power, Play/Stop, Volume +/- and Reverse/Forward are easy in operation and have the least chance of getting faulty due to moisture.

Where most of the new wireless speakers fail for the first time while pairing up with other devices, BlitzWold BW-F3 got paired in the first attempt with the distance from the device of around 30 feet. Also, the operation of this Bluetooth Wireless speaker was smooth when the phone with which it was paired was in the pocket and kept at the distance of around 20 feet. The hands-free feature is also helpful where you can easily turn off the Bluetooth to answer a personal call. The speaker is powered with Bluetooth BT4.0 version. The transmission range of the speaker is about 10 meters.
Coming towards the main purpose, Music. After completely charging this portable Bluetooth Wireless Speaker and synchronizing the phone. The speaker turned out to be loud. The bass of the speaker got distorted on playing the song with high bass. But on reducing the volume by around 70 to 80% if was normal. The speaker's performance at 80% is quite impressive. The bass note is great with crystal clear music sound.
This portable Bluetooth Wireless speaker comes with a note mentioning not to make it wet. Thus, when playing outside in gardens, workshops, bathroom, etc. ensure that it is kept on a dry surface. Avoid playing the speaker where the level of moisture or water is high, mud or similar condition which can damage the speaker in short time.
In order to boost your love towards music or willing to go for a long ride alone on a bike, there is a provision to mount the same on a tripod. The screw mount hole on the underside of the speaker which helps for easy installation on a tripod, over the bike, and much more.
If you are hunting for a best portable Bluetooth Wireless Speaker which can be played in any outdoor condition, than BlitzWolf BW-F3 which is IP65 rated is the best option you should opt for. The design of this speaker is done with good quality, best sound output at an affordable price when compared with other premium brands.
The product is available in two different colours, yellow and blue. The approx. the weight of the product is 425 grams and the dimensions are measured as 173 * 73 * 49 mm /  6.8 * 2.8 * 2 inches.
You can buy BlitzWolf BW-F3 from the official Banggood E-Commerce store. It is priced approximately Rs. 1960 for all Indian Customers along with free shipping and delivery.
Summarizing the review, the highlight features are as follows -
1) Battery Life - The in-built rechargeable lithium battery is of 2000mAh. Thus, can help to play your favourite music or can keep the party on for around 6 to 8 hours
2) Connectivity - The speaker can be wirelessly paired with any Bluetooth device or by a 3.5mm audio jack cable
3) Hi-Fi Sound - The two 5W powerful speakers help to provide high fidelity, crystal clear and crisp sound along with robust bass. It also has a passive subwoofer
4) Water-proof Mic - The speaker has an in-built water-proof MIC which noise reduction technology and watertight sealed for handsfree functionality. This helps to ensure smooth and clear communication without using the phone

5) Ingress Protection (IP65) - BlitzWolf BW-F3 is IP65 complied which makes it easy to carry outdoors. It has the ability to withstand getting damage by getting wet or any dusty environment.
Share:

Tuesday 2 January 2018

Joyoshare HEIC Converter : Best HEIC Converter Tool

Joyoshare HEIC Converter for Mac: Best HEIC Converter Tool


With the increase of digital world, more and more people are becoming tech savvy. Thus, they are not only updated about the current technology but also are the one who owns one product of each technology. As there are various leading tech giants such as Apple, Android, Windows, Mac, etc., everybody has their own pattern to give a better result. Thus, to share and view the photos, videos, files, etc. over a single platform is quite difficult. But there are softwares available which can help convert the media files such as photos, videos, etc. which can be viewed without affecting the clarity or the detailing of the original file. Few such softwares are Joyoshare Video Converter, Joyoshare Media Cutter, Joyoshare HEIC Converter, and much more. 
You must try the trial version of Joyoshare HEIC Converter for MAC OS, which can be used as HEIC converter to JPEG, HEIC converter online, and many more.

Joyoshare HEIC Converter : Best HEIC Converter Tool


The important functions of Joyoshare HEIC Converter for Mac:

1. Convert HEIC photos to JPG, PNG, BMP without picture distortion.

HEIC or HEIF are the two new formats of the image which in which are a pattern of iOS11. The advantage of this image compression technique is that it reduces the space without compromising the quality. Thus, to view the captured moments can be converted into any universal accepted format such as JPG, BMP, PNG, and much more by downloading the free trial version of Joyoshare HEIC converter. This software help to convert the format without distorting or degrading the clarity of the picture.
Below are the screeshots of this software:


2. Best solution to convert HEIC to JPG, PNG, GIF and more.

When you ask your friend to click a perfect picture from their expensive phone, but just imagine that photo cannot be used by you. As currently, HEIC/HEIF can only be decompressed by devices with iOS11 or macOS High Sierra. But if you want to share those memorable moments with your family or friends who are still using the old iOS, Windows, MAC or any other devices then Joyoshare HEIC Converter is the best software. It helps to convert photos in HEIC format to PNG, JPG, GIF, TIFF, BMP, WEBF, and other used image formats without affecting the actual resolution of the image and details.

3. Most efficient HEIC to JPG Converter with zero loss quality. 

The images captured from iPhone X, iPhone 8 Plus/8, iPhone 7 Plus/7 are in HEIC format which can easily be converted into JPG, BMP, PNG, and any other require format using Joyoshare HEIC converter in just a few clicks. The software is capable enough to insert EXIF data after converting the photo. The trial version of Joyoshare HEIC Converter will guarantee to help you to recreate photos clicked from iOS 11, i.e. HEIC into JPEG, GIF, PNG, and much more without spoiling the quality of the image. Other than free online converters which are available online which may leak your private image by storing the image in the cloud, Joyoshare HEIC to JPEG Converter helps to convert offline on your personal MAC computer. Thus, it is 100% safe.

4. Fastly convert HEIC images to JPG, PNG with two modes in seconds.

Joyoshare Mac HEIC Converter is built with great image encoding engines which can easily convert HEIC to JPEG, TIFF, BMP, and much more. The algorithm helps to convert in two different modes like single mode or batch mode as per requirement. The software is so user-friendly that the user can simply drag and drop any HEIC photos from any iOS 11 to Joyoshare, then click on Convert and conversion will be done instantly into the desired format.

Thus, download and try the trial version of Joyoshare HEIC Converter for MAC and share your memorable moments with loved once.
Share:

Saturday 25 November 2017

{Latest} Netflix Accounts and Passwords | Working 2020

WORKING Netflix Accounts and Passwords 2020

NetFlix is one of the most popular online streaming services nowadays. There are so many shows which are available on the Netflix for binge-watching. This streaming service is now even much popular than Amazon prime and others according to some recent surveys and why not there are so many shows which are of top quality like Stranger Things, Daredevil, Jessica Jones, Marvel's defenders etc. The best part about the Netflix is that they don't make their audiences wait for the next episode of a show they entirely release a season on a single day so that users can easily binge watch them or watch them one at a time according to their time.
{Latest} Netflix Accounts and Passwords 2017
{Latest} Netflix Accounts and Passwords 2020

Not only you can watch their Tv shows but along with that you can also easily watch movies and other Tv shows as well and the best part about Netflix is that you don't have to worry about how many times you play or watch a single movie or a Tv show, You can do it as many times as you like. The thing with Netflix is that it provides all of its controls or command in hand of the user So that user can decide which episode to watch or which movie to see and when to see. So if you are having trouble in keeping up with a Tv show simply because you missed the air time of that show or want to watch a movie multiple times then Netflix is the best option for you.
To put it in simple words Netflix is a video on demand service where you demand and Netflix provides, The only issue with the Netflix is that it is paid and not everyone can afford to pay monthly charges just to watch a single Tv show. If you are one of those guys then this article is for you, In this article I will provide you with information on how you can easily enjoy premium services of Netflix without paying any money, So without wasting much of a time let us get started
FIRST METHOD
The first method is one of the oldest tricks in the book. All you need to do is just simply follow the instructions below to use the NetFlix for free.
1.First, go to NetFlix and then click on the button that says start your monthly trial.
2. Once you have done that you need to select your plan. I would recommend you to select the premium since you are not going to be paying any money
3. After that create your account and provide the NetFlix with your card details, Don't worry your money won't get deduced until the end of the trial.
4. After that, you can easily enjoy Netflix for a month without any issue.
5.Now the trick here is once your trial is about to end, Simply cancel the subscription and you won't be charged a penny and then you can simply create a different account and just keep on enjoying the Netflix on a monthly basis.

This method is easy but it is really hectic and if you forget there is a chance that your money might get deducted so for that reasons I am providing you with a second method.


SECOND METHOD
This method you will not exactly lose money but you will be able to spend only less money than expected. Follow the steps given below
1.You need to go to Netflix.com and then simply login or create your account.
2.Once you have done that you will be requested to select your desired plan and as you can see that there are three plans basic, Standard and Premium.
3. Now except for the basic plan you will see that in premium and in the standard plan you can stream at minimum two screens without any issues.
4. So if you and your friends can contribute some money together and but either of these plans then it is also ok.
5. There is no illegal in doing that you just have to share your account credentials and just keep in mind that not more than two screens are streaming at a time in case you take a standard plan or not more than four screens just in case you decided to take the premium plan.
6. There is basically no difference between standard and premium plan except for the fact that there are two more additional screens available for streaming for the user along with Ultra HD.

Above mentioned are some tricks that you apply in case you want to enjoy Netflix for free or for some less cash, Other than that if you are still looking for free accounts then I would recommend that you should take a look at the below list where I have provided some list of accounts which have been already activated on the Netflix along with their passwords and also I have mentioned the number of days for which they have been activated. All you need to do is just use those credentials to sign in into Netflix and just watch the show and feel free to share them with your friends.

[email protected]                 mickey       60 Days
[email protected]              tragic         60 Days
[email protected]          17737271888   30 Days
[email protected]             123456         90 Days
[email protected]         substation232    30 Days
[email protected]               cdefgahc        30 Days
[email protected].     giveaway.        30 days
[email protected]               danbrown2     90 Days
[email protected]           gatewaysTc      30 Days
[email protected]         MeOnly$1       30 Days
[email protected]               sophie          30 Days
[email protected]         benjamin03      30 Days
[email protected]    jm2719          60 Days
[email protected]          diecast8         60 Days
[email protected]         artshart         60-Days

I really hope with the information on the above accounts and overall details about the tips and tricks that I have mentioned which will allow you to easily watch Netflix has helped you and has come to your use free netflix accounts,free netflix accounts passwords. I guess that's it for me and Happy Binge Watching!
Share:

Sample Text

Copyright © GeeksGyan | Best Tips and Tricks | Powered by Blogger Design by ronangelo | Blogger Theme by NewBloggerThemes.com